数据集
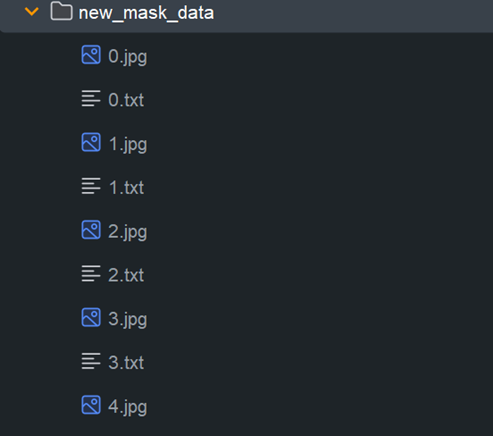
数据集原本格式如下图所示:
使用下面代码将数据集的格式进行转换:
import os
import shutil
import random
# 原始数据路径(图像和标注文件在同一文件夹下)
<NolebasePageProperties />
original_data_path = "../new_mask_data/"
# 当前工作目录
cur_path = os.getcwd()
# 目标路径
train_image_path = os.path.join(cur_path, "datasets/images/train/")
train_label_path = os.path.join(cur_path, "datasets/labels/train/")
val_image_path = os.path.join(cur_path, "datasets/images/val/")
val_label_path = os.path.join(cur_path, "datasets/labels/val/")
test_image_path = os.path.join(cur_path, "datasets/images/test/")
test_label_path = os.path.join(cur_path, "datasets/labels/test/")
# 记录文件路径
list_train = os.path.join(cur_path, "datasets/train.txt")
list_val = os.path.join(cur_path, "datasets/val.txt")
list_test = os.path.join(cur_path, "datasets/test.txt")
# 数据划分比例
train_percent = 0.8
val_percent = 0.1
test_percent = 0.1
def del_file(path):
"""删除文件夹中的所有文件"""
for i in os.listdir(path):
file_data = os.path.join(path, i)
os.remove(file_data)
def mkdir():
"""创建目标文件夹"""
for path in [train_image_path, train_label_path, val_image_path, val_label_path, test_image_path, test_label_path]:
if not os.path.exists(path):
os.makedirs(path)
else:
del_file(path)
def clearfile():
"""清理记录文件"""
for file in [list_train, list_val, list_test]:
if os.path.exists(file):
os.remove(file)
def main():
mkdir()
clearfile()
file_train = open(list_train, 'w')
file_val = open(list_val, 'w')
file_test = open(list_test, 'w')
# 获取所有文件名(假设图像为.jpg,标注为.txt)
total_files = [f for f in os.listdir(original_data_path) if f.endswith('.jpg')]
num_files = len(total_files)
list_all_files = range(num_files)
# 按比例划分数据
num_train = int(num_files * train_percent)
num_val = int(num_files * val_percent)
train = random.sample(list_all_files, num_train)
val_test = [i for i in list_all_files if i not in train]
val = random.sample(val_test, num_val)
print("训练集数目:{}, 验证集数目:{}, 测试集数目:{}".format(len(train), len(val), len(val_test) - len(val)))
for i in list_all_files:
name = total_files[i][:-4] # 去掉文件扩展名
src_image = os.path.join(original_data_path, name + '.jpg')
src_label = os.path.join(original_data_path, name + '.txt')
if i in train:
dst_image = os.path.join(train_image_path, name + '.jpg')
dst_label = os.path.join(train_label_path, name + '.txt')
file_train.write(dst_image + '\n')
elif i in val:
dst_image = os.path.join(val_image_path, name + '.jpg')
dst_label = os.path.join(val_label_path, name + '.txt')
file_val.write(dst_image + '\n')
else:
dst_image = os.path.join(test_image_path, name + '.jpg')
dst_label = os.path.join(test_label_path, name + '.txt')
file_test.write(dst_image + '\n')
# 复制文件
shutil.copyfile(src_image, dst_image)
shutil.copyfile(src_label, dst_label)
file_train.close()
file_val.close()
file_test.close()
if __name__ == "__main__":
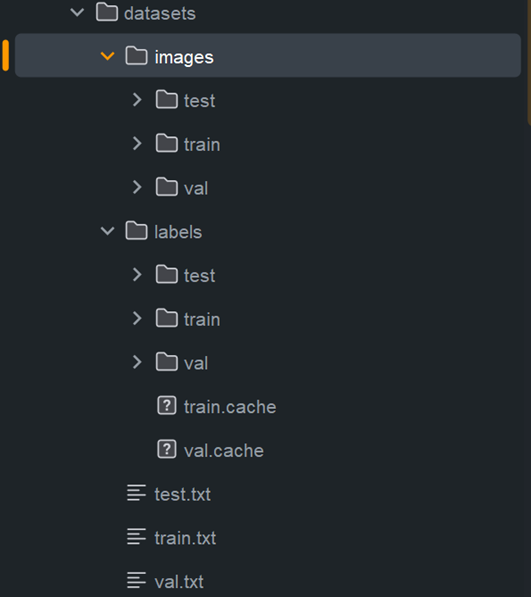
main()转换之后的数据格式如下:
在保证数据集一致的情况下,分别使用yolov11和RT-DETR针对口罩进行识别。
下面是声明数据集的yaml文件详情:
path: ./  # 数据集所在路径
train: train.txt  # 数据集路径下的train.txt
val: val.txt  # 数据集路径下的val.txt
test: test.txt  # 数据集路径下的test.txt

# Classes
names:
  0: unmask
  1: mask
YOLO 11
YOLO 11 的训练代码如下:
from ultralytics import YOLO

if __name__ == '__main__':
    model = YOLO(model='yolo11.yaml')
    model.train(pretrained=False, data='./data.yaml', epochs=50, batch=8, device=0, imgsz=640, workers=2)
其中,设置训练轮数为 50,每批次的数据数量为 8。
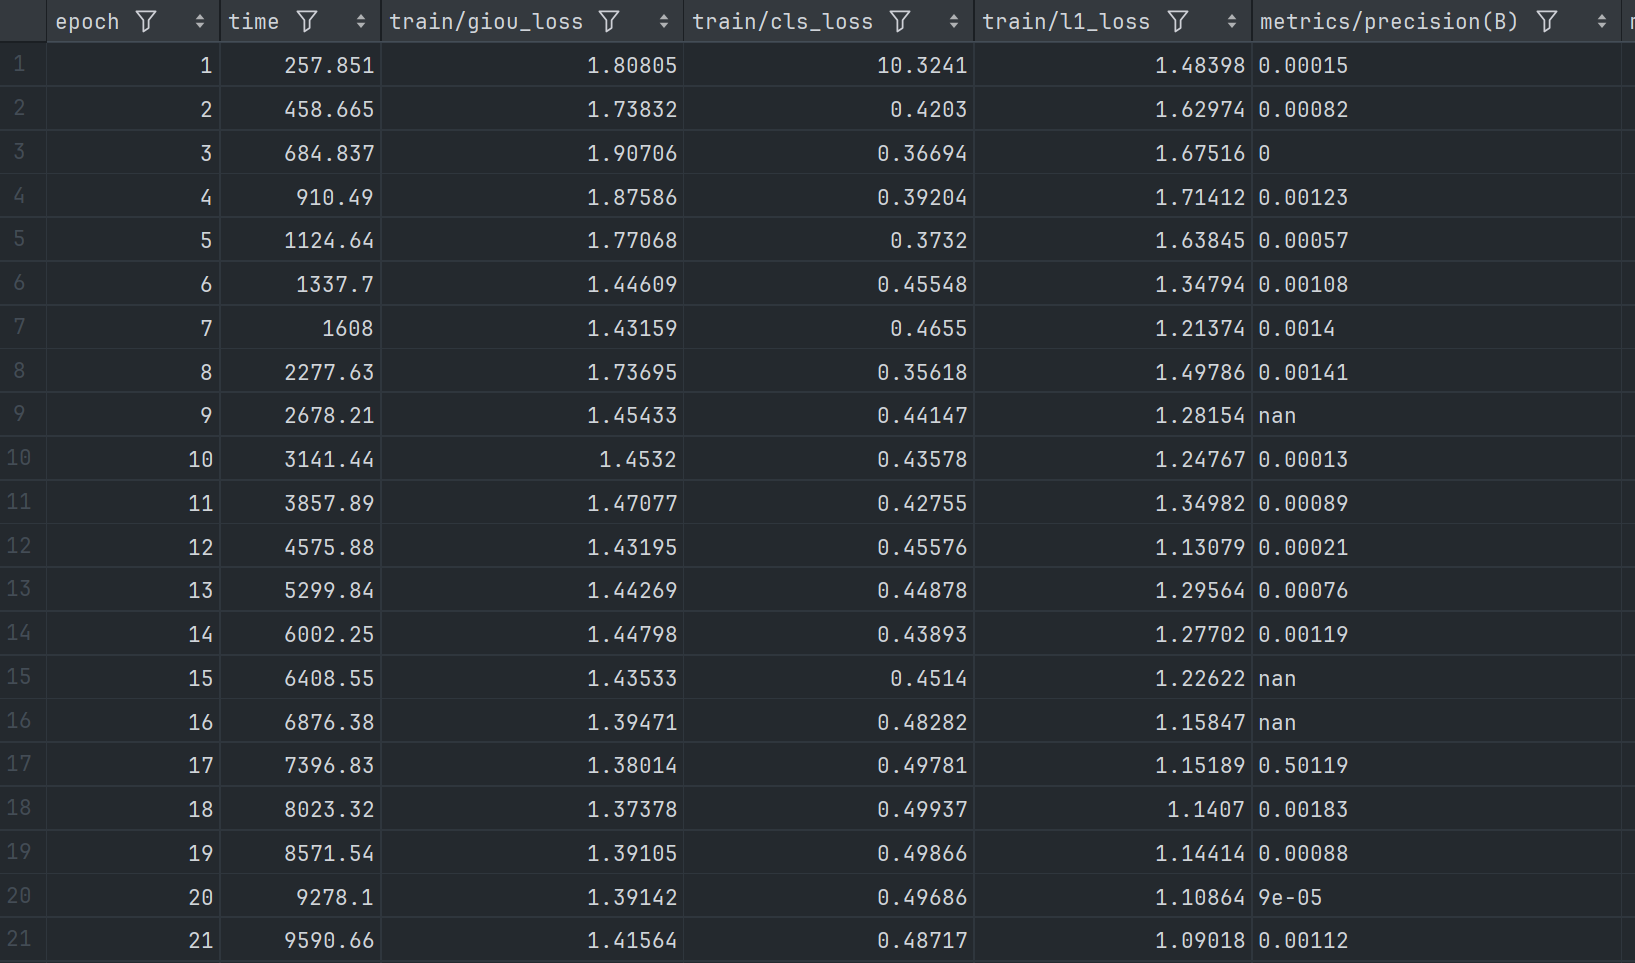
下面是训练过程结果生成的 csv 文件截图为:
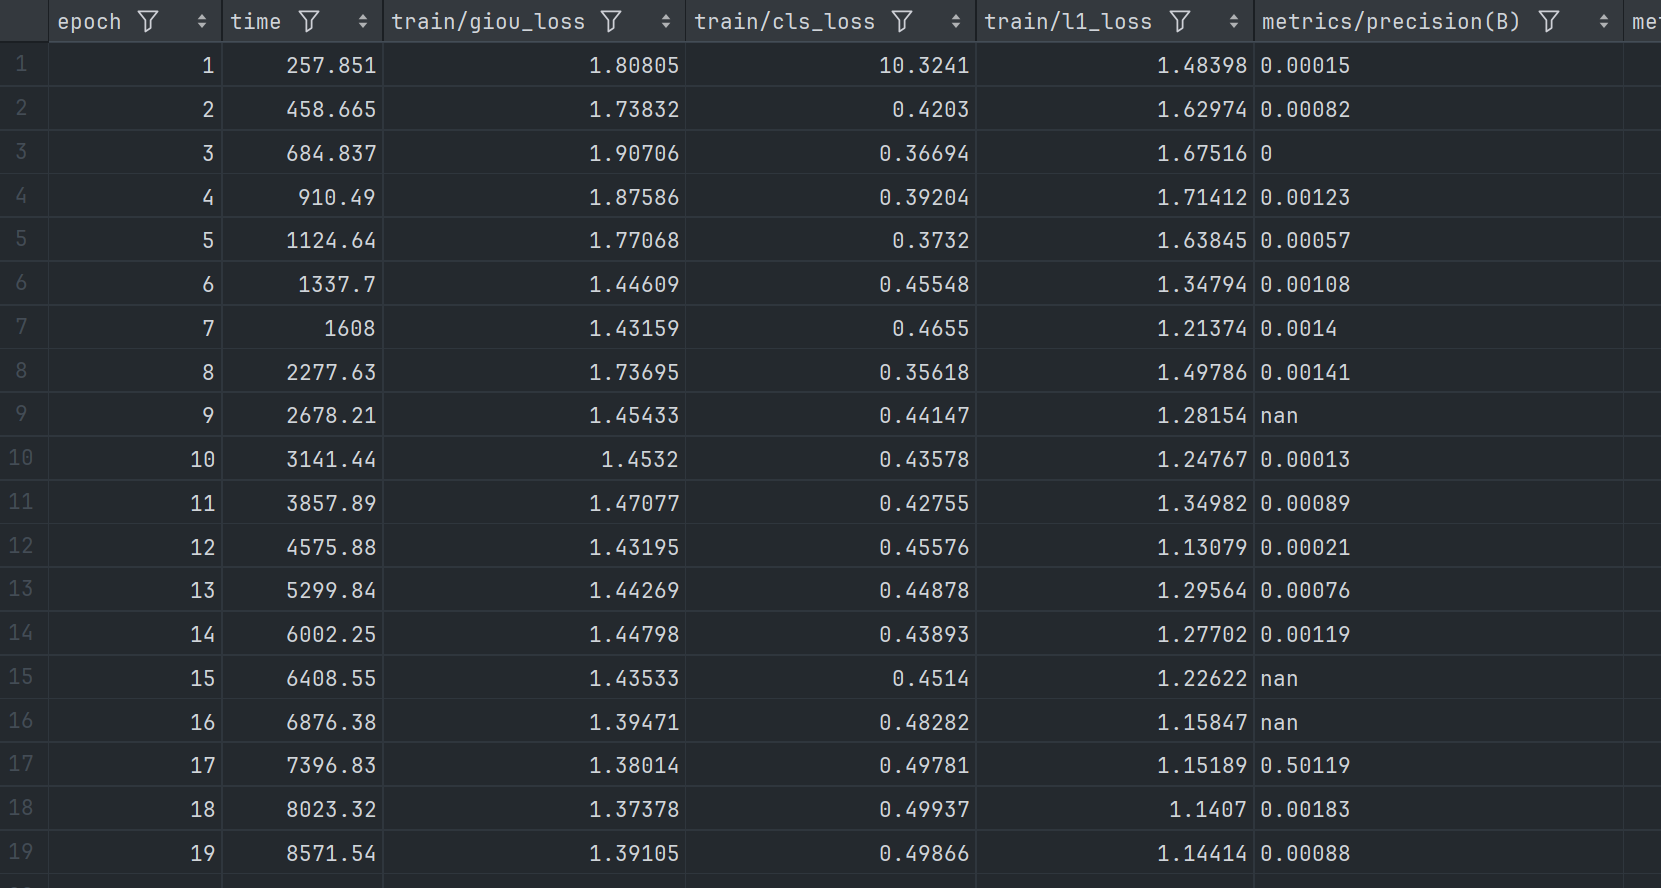
其中,训练过程各个参数变换为:

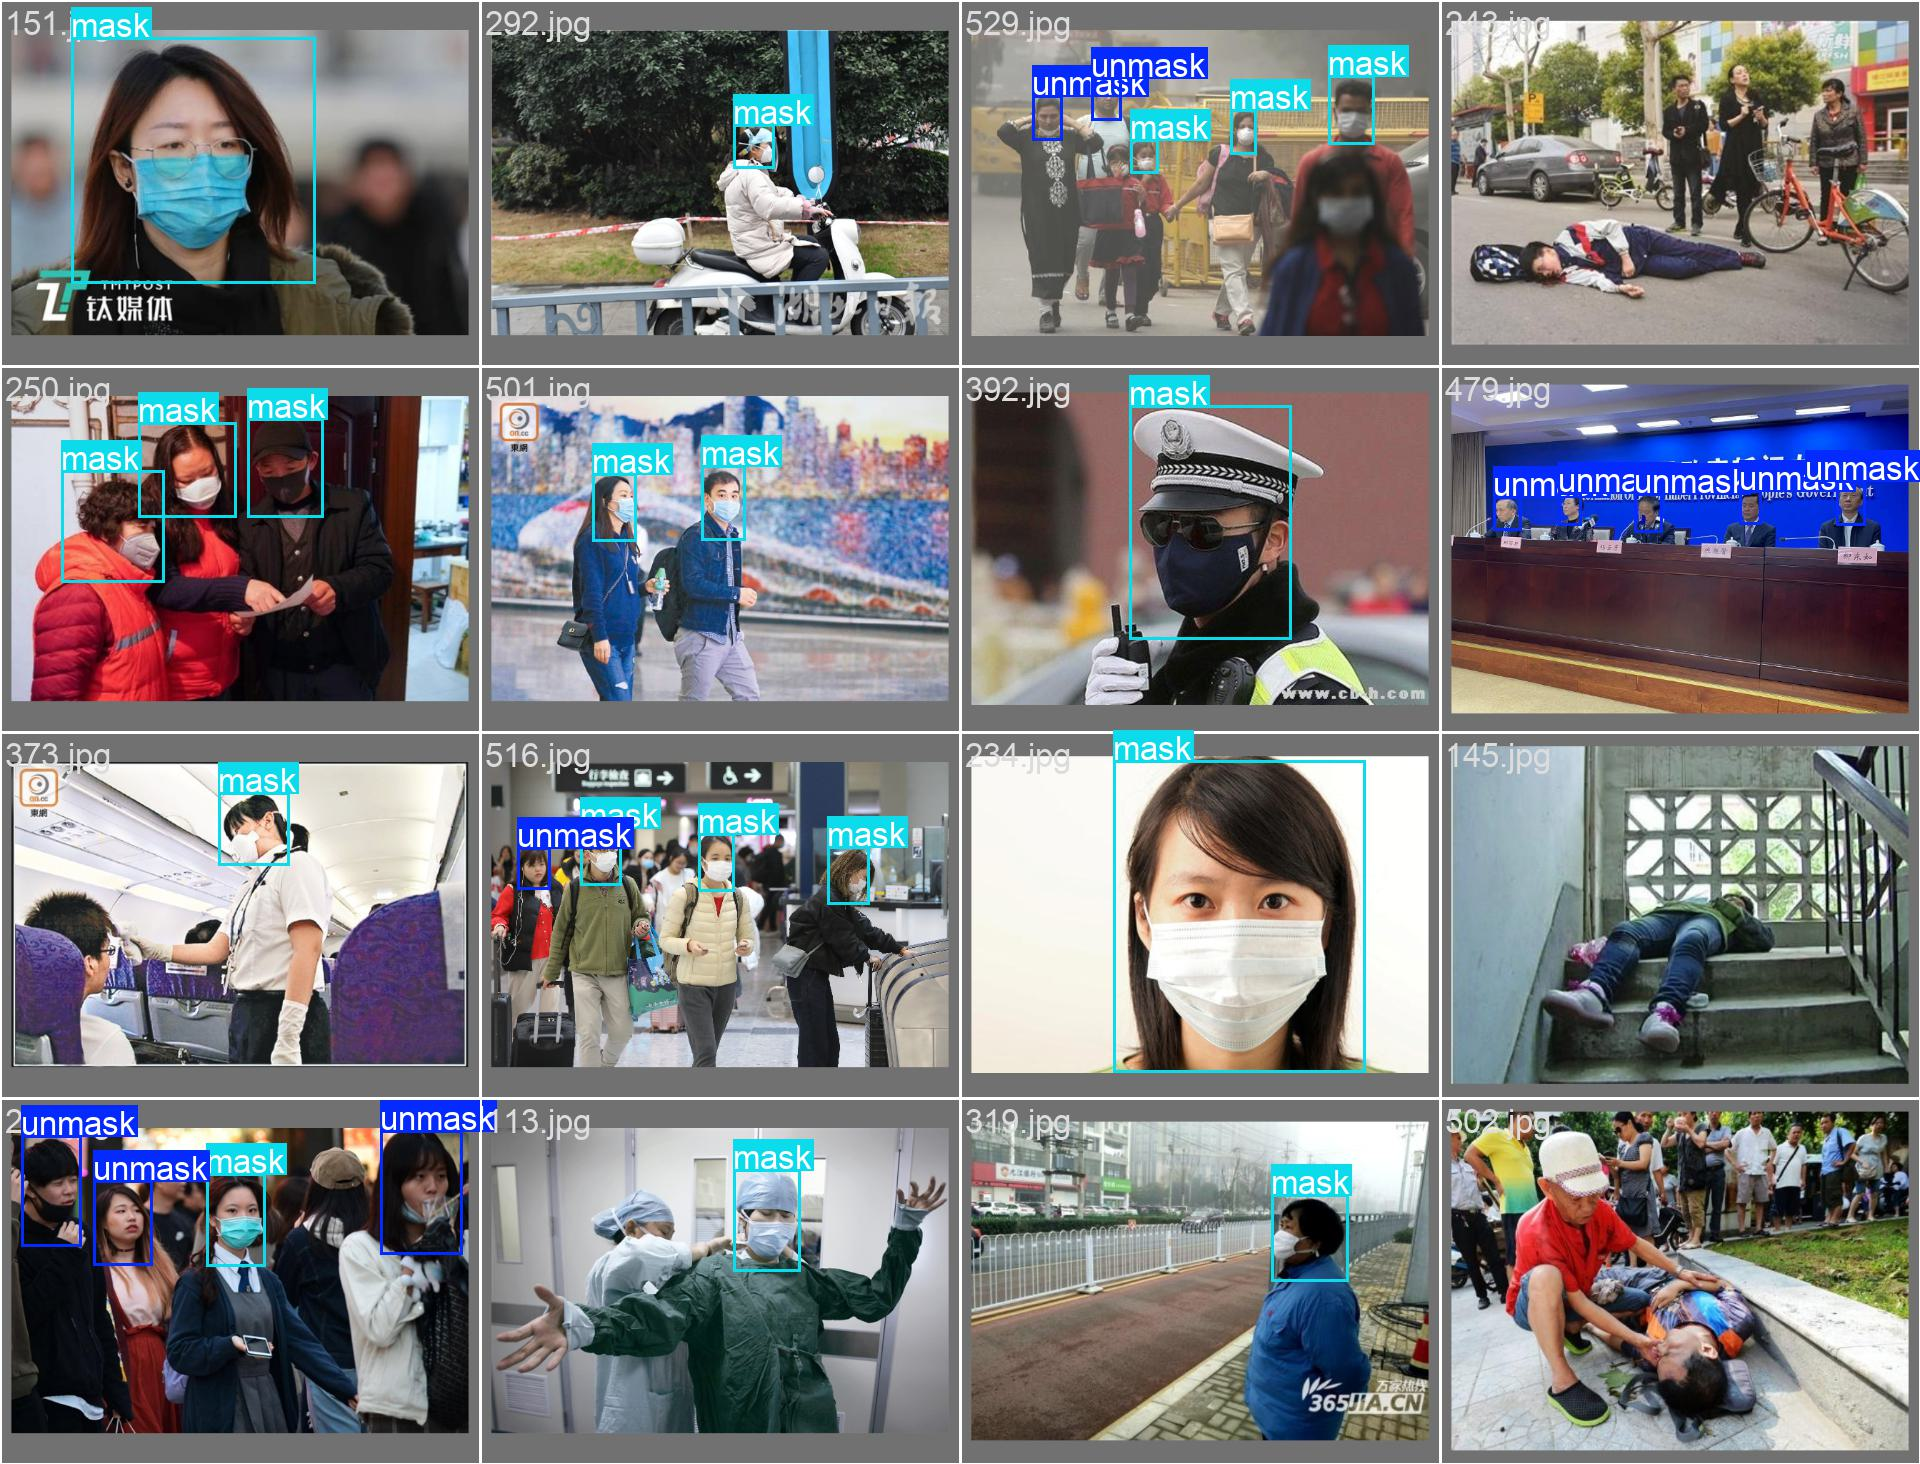
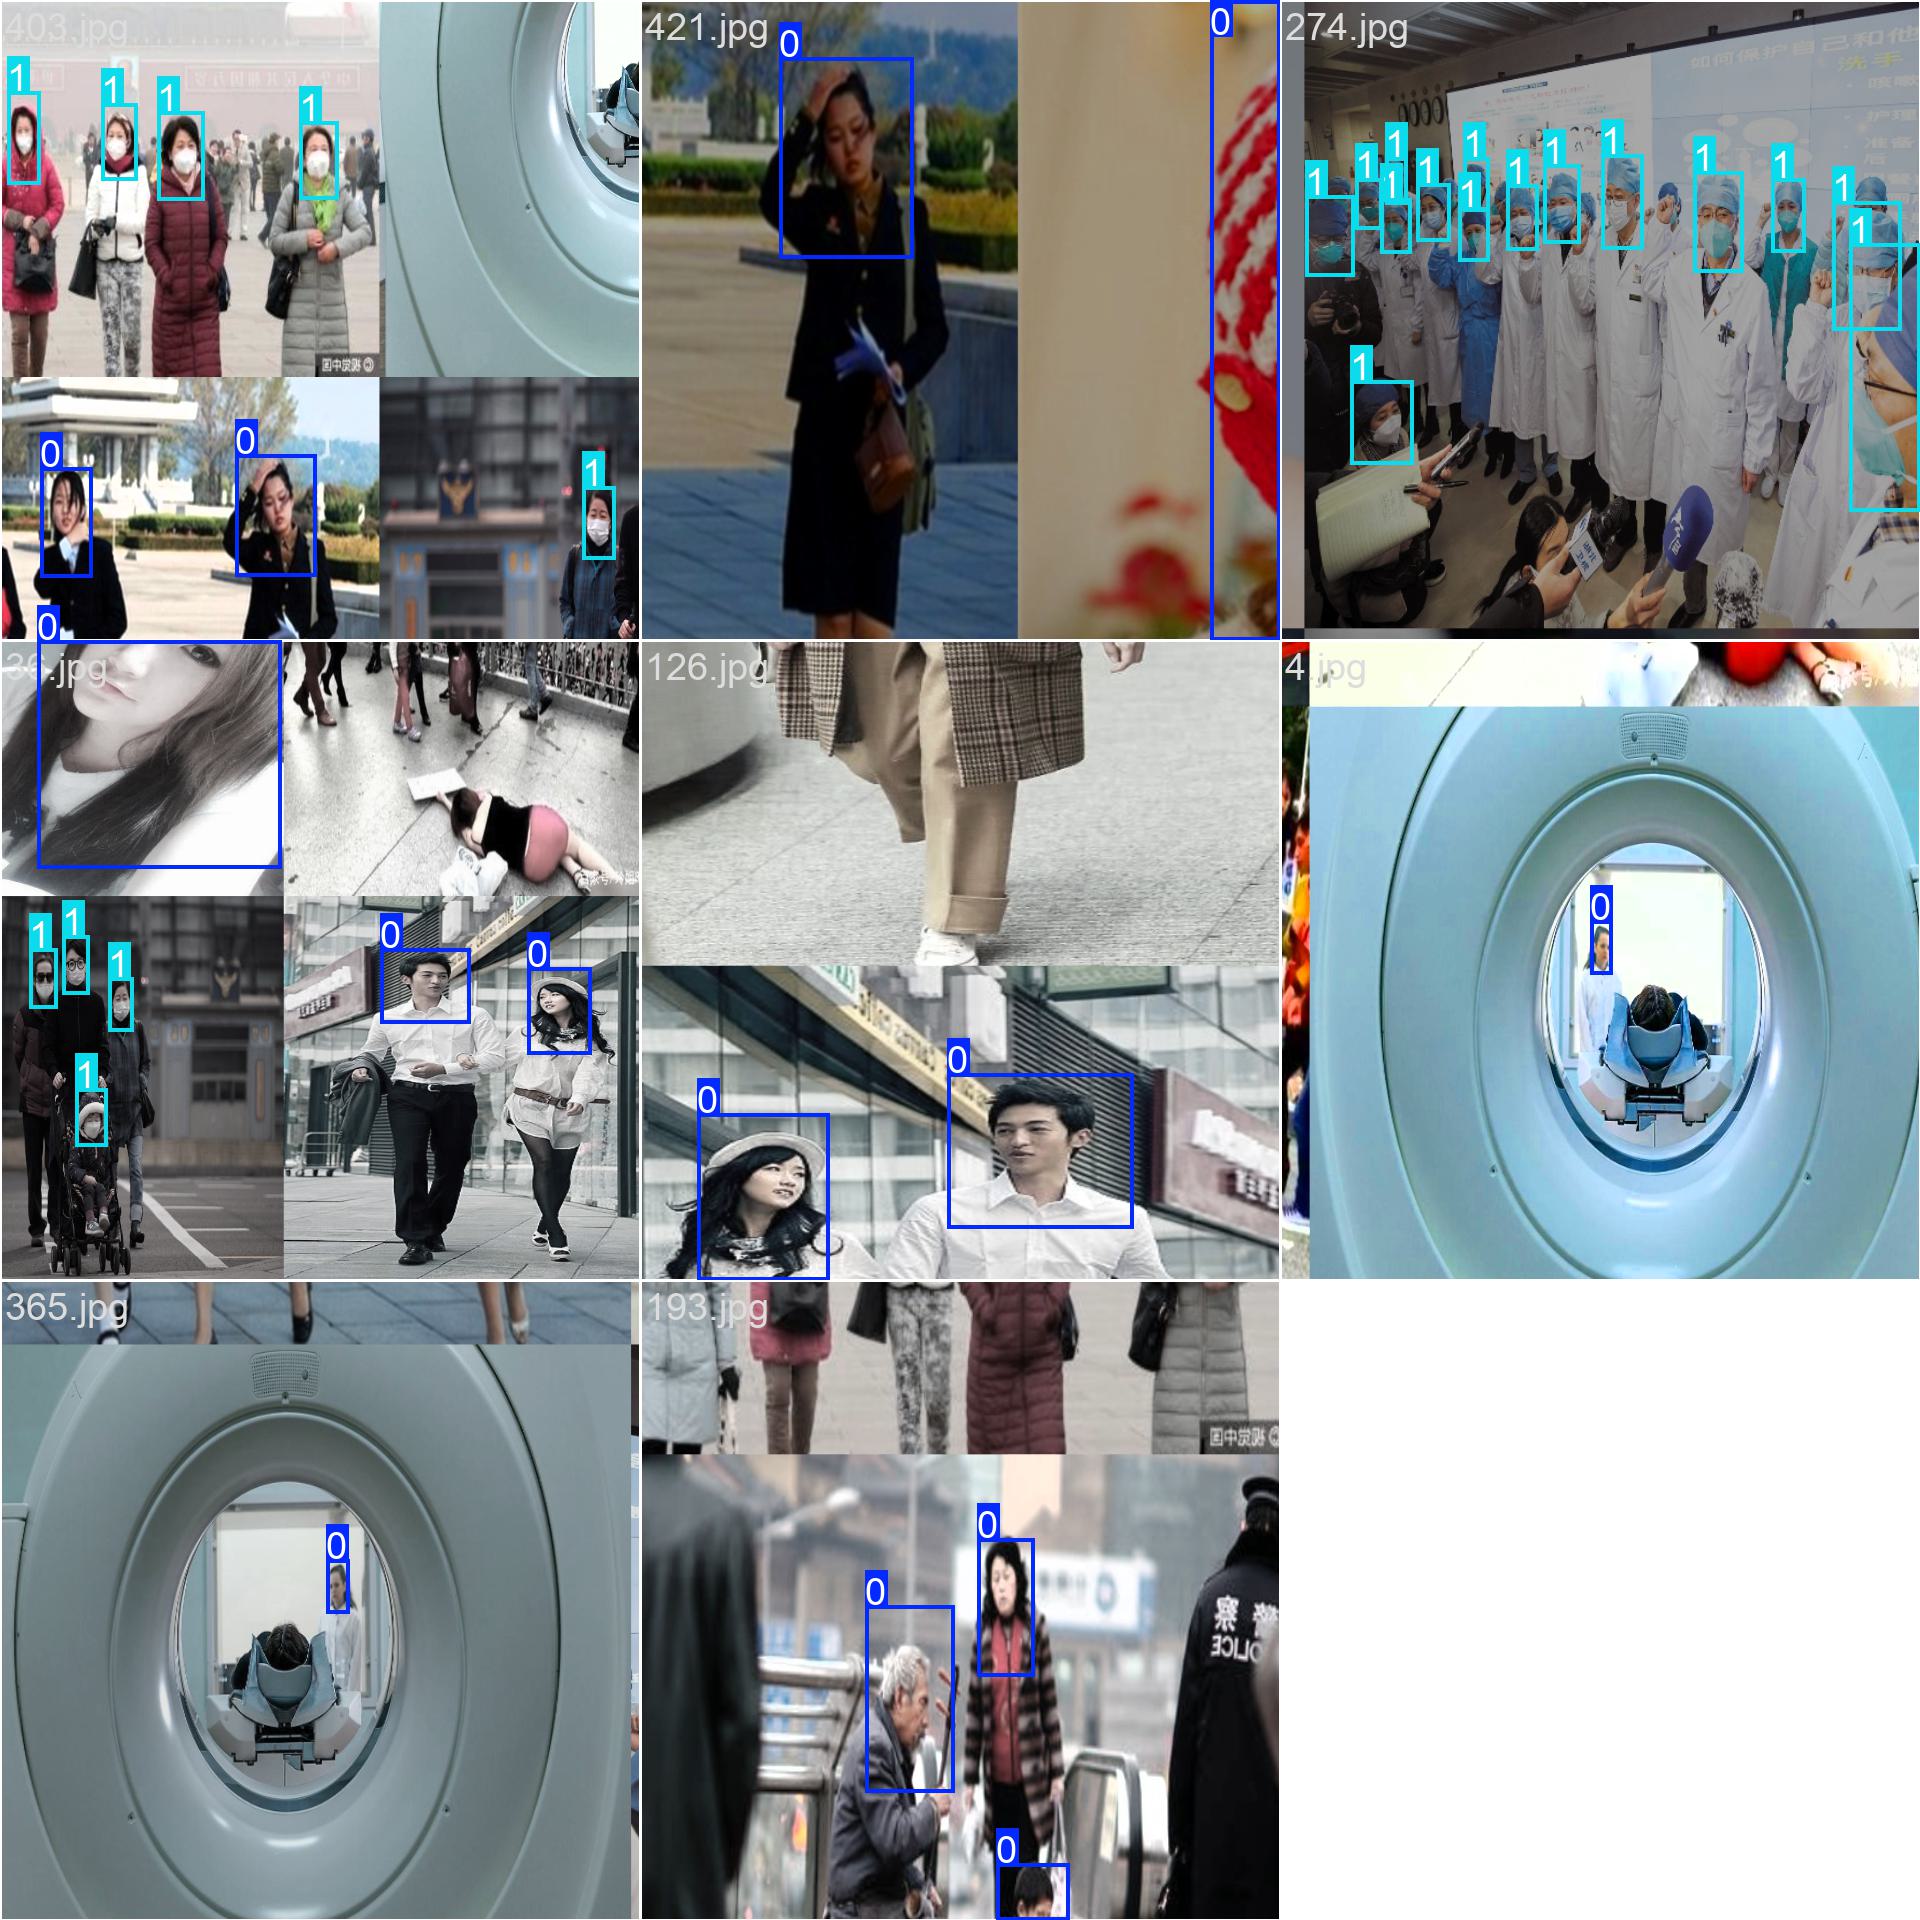
使用训练出来的模型进行预测的结果基本如下:


可以发现虽然预测结果还行,但是发现还未拟合,可以增多训练轮数。下面从 50 轮提高到 200 轮:
训练出来的结果如下:
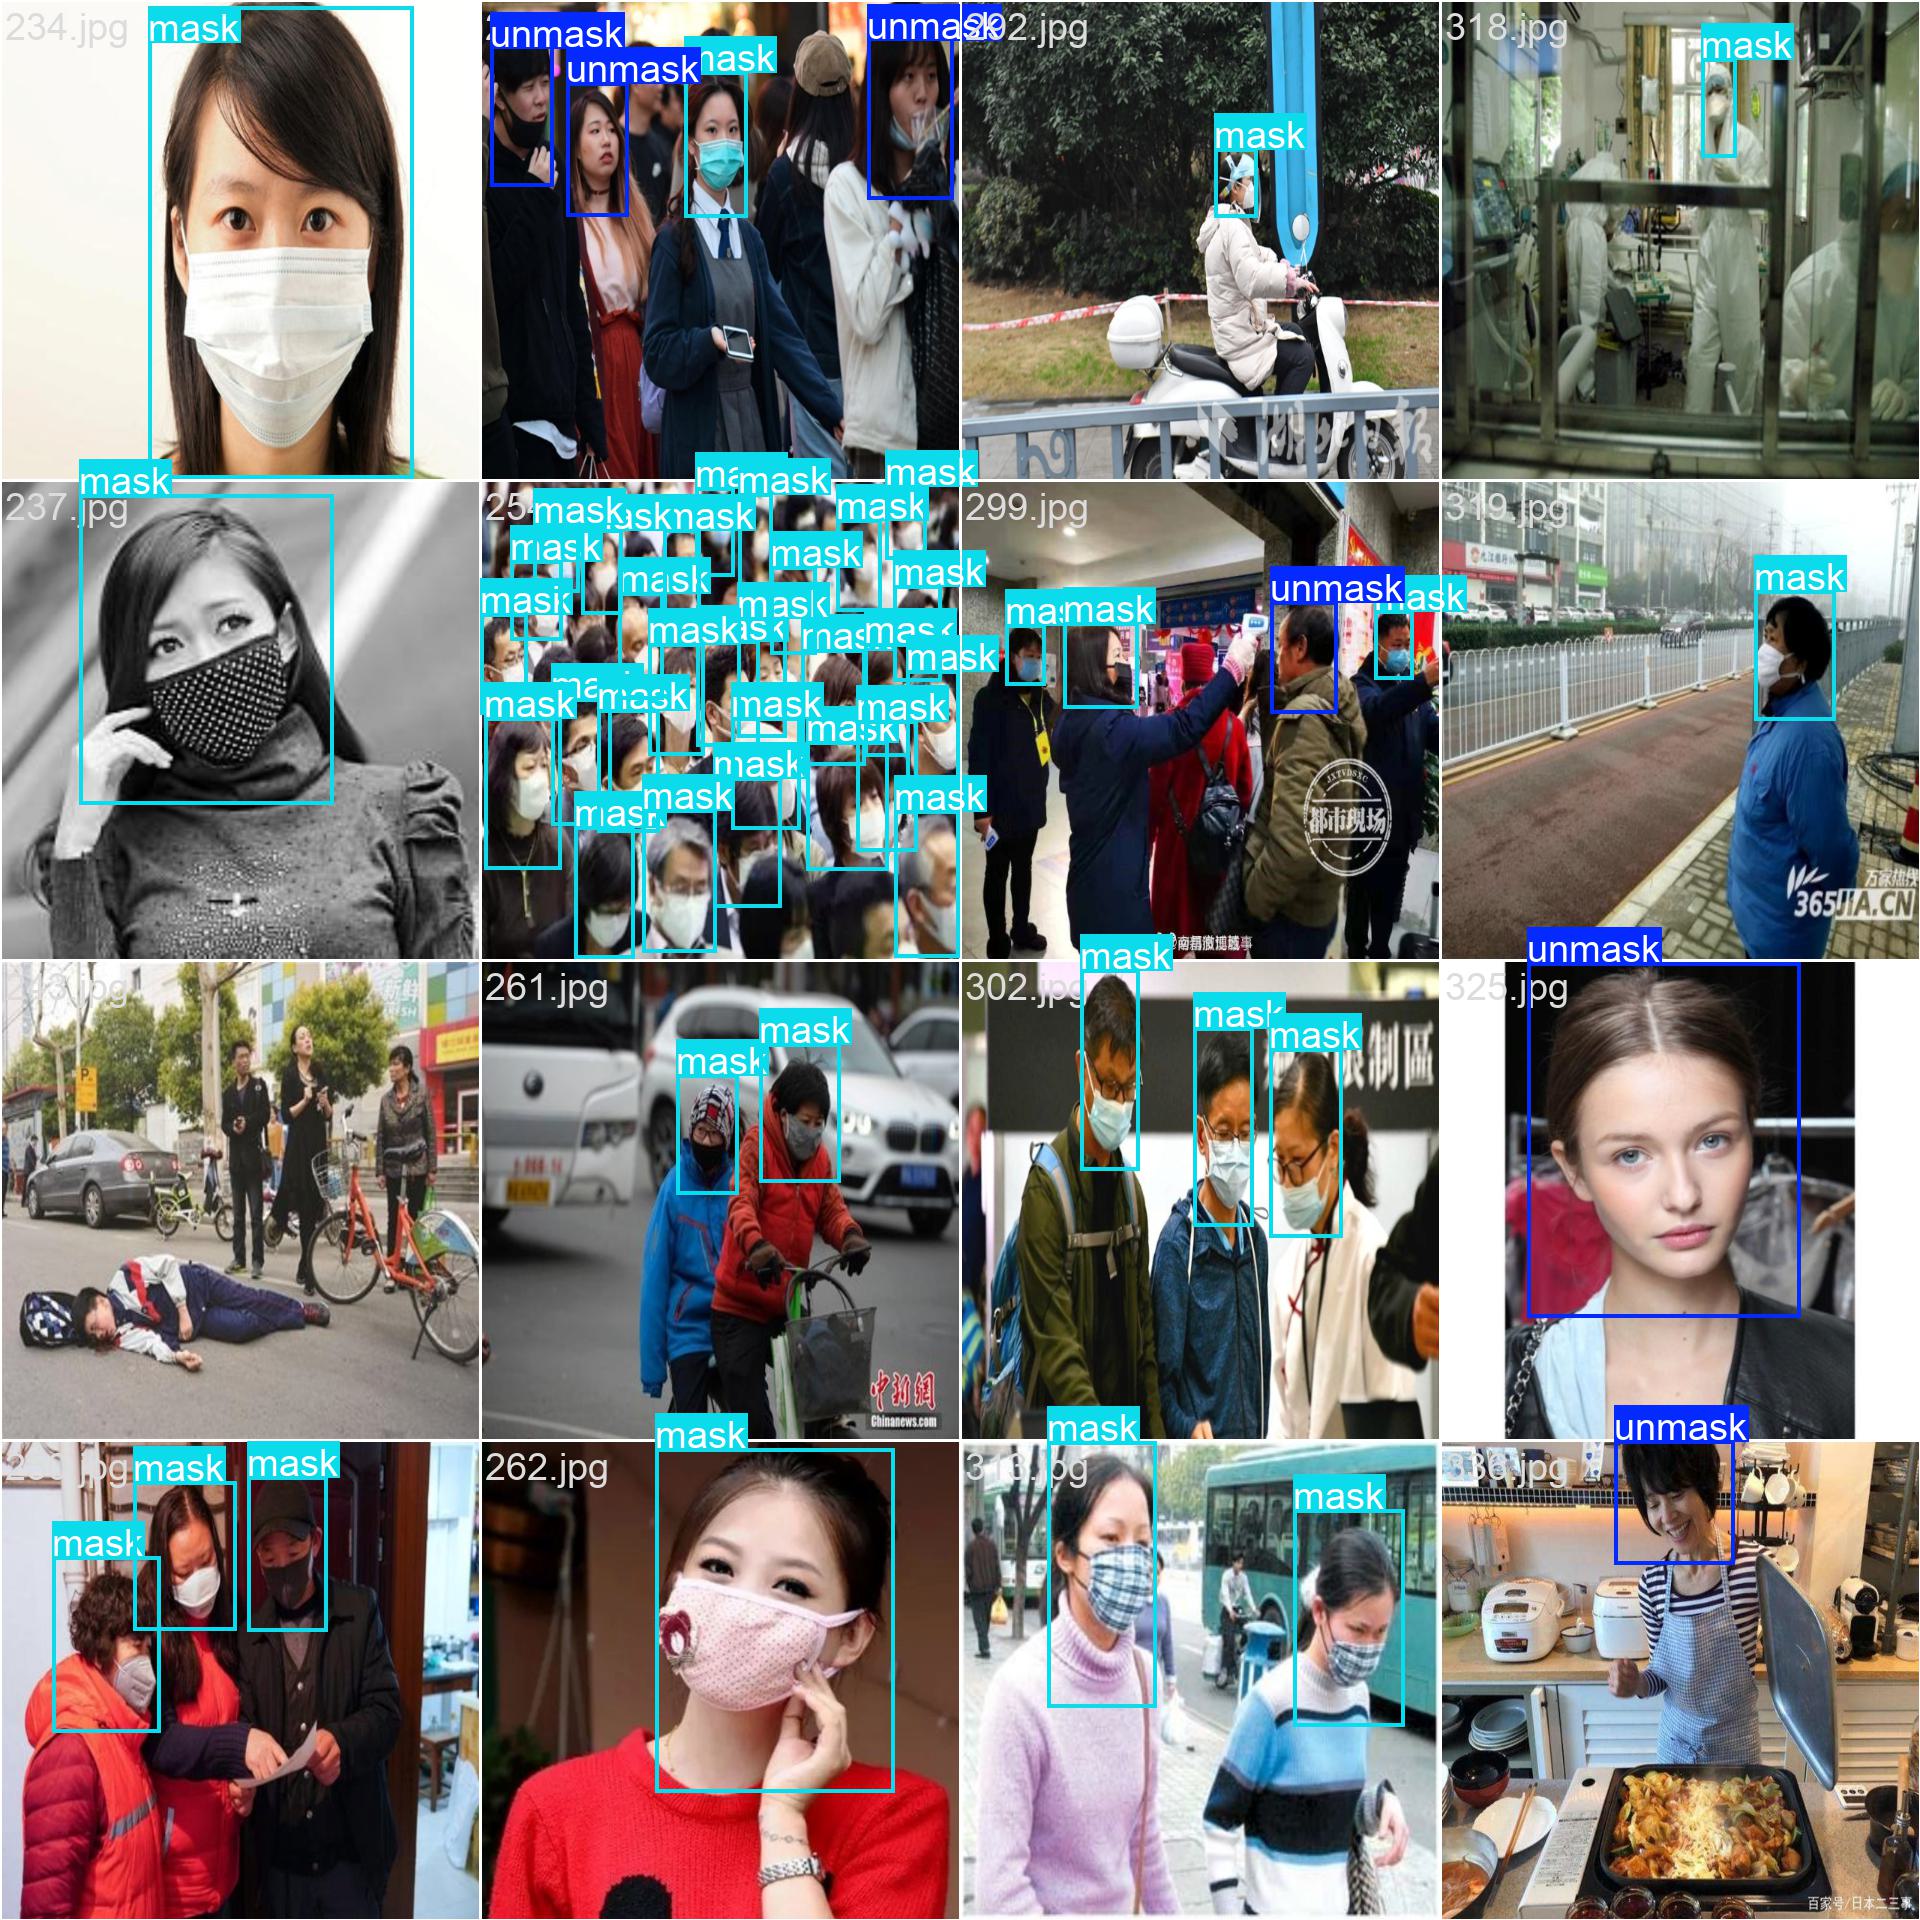
使用 200 轮训练出来的模型进行预测:
RT-DETR
接下来使用 RT-DETR 算法在同一数据集上进行训练,训练代码如下:
from ultralytics.models import RTDETR
if __name__ == '__main__':
model = RTDETR(model='rtdetr-l.yaml')
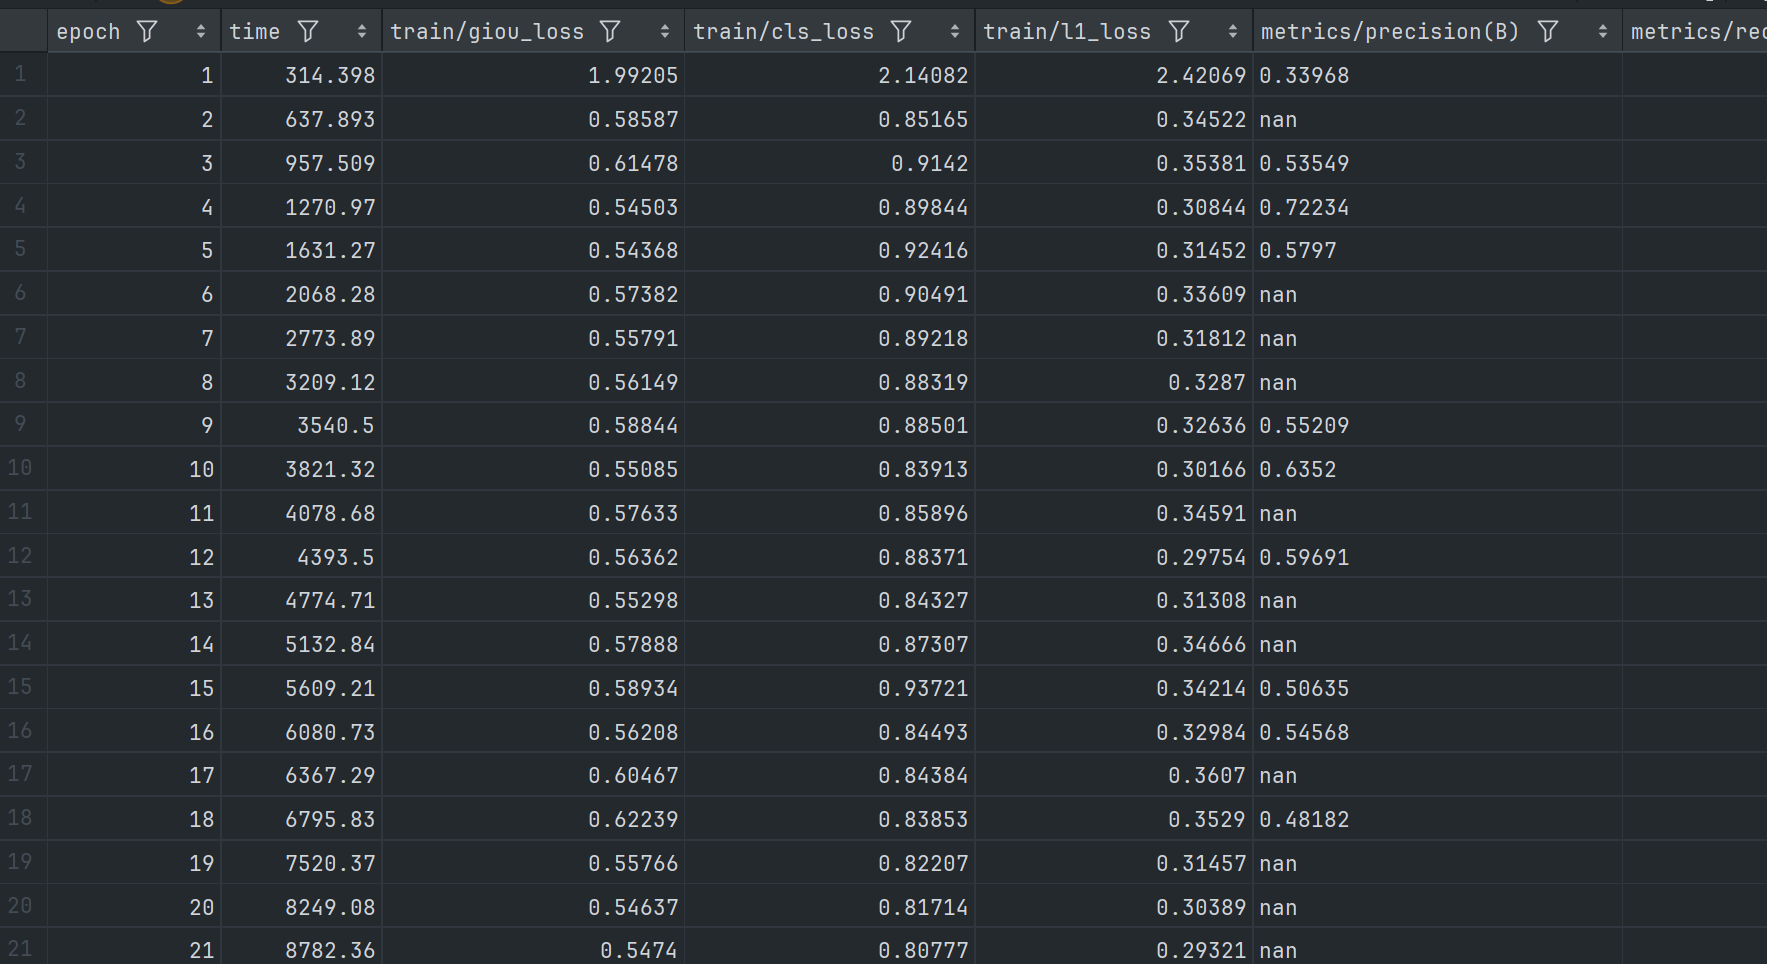
model.train(pretrained=False, data='./data.yaml', epochs=50, batch=8, device=0, imgsz=640, workers=2)依然采用 50 轮次进行训练,训练过程得到 csv 文件截图如下:
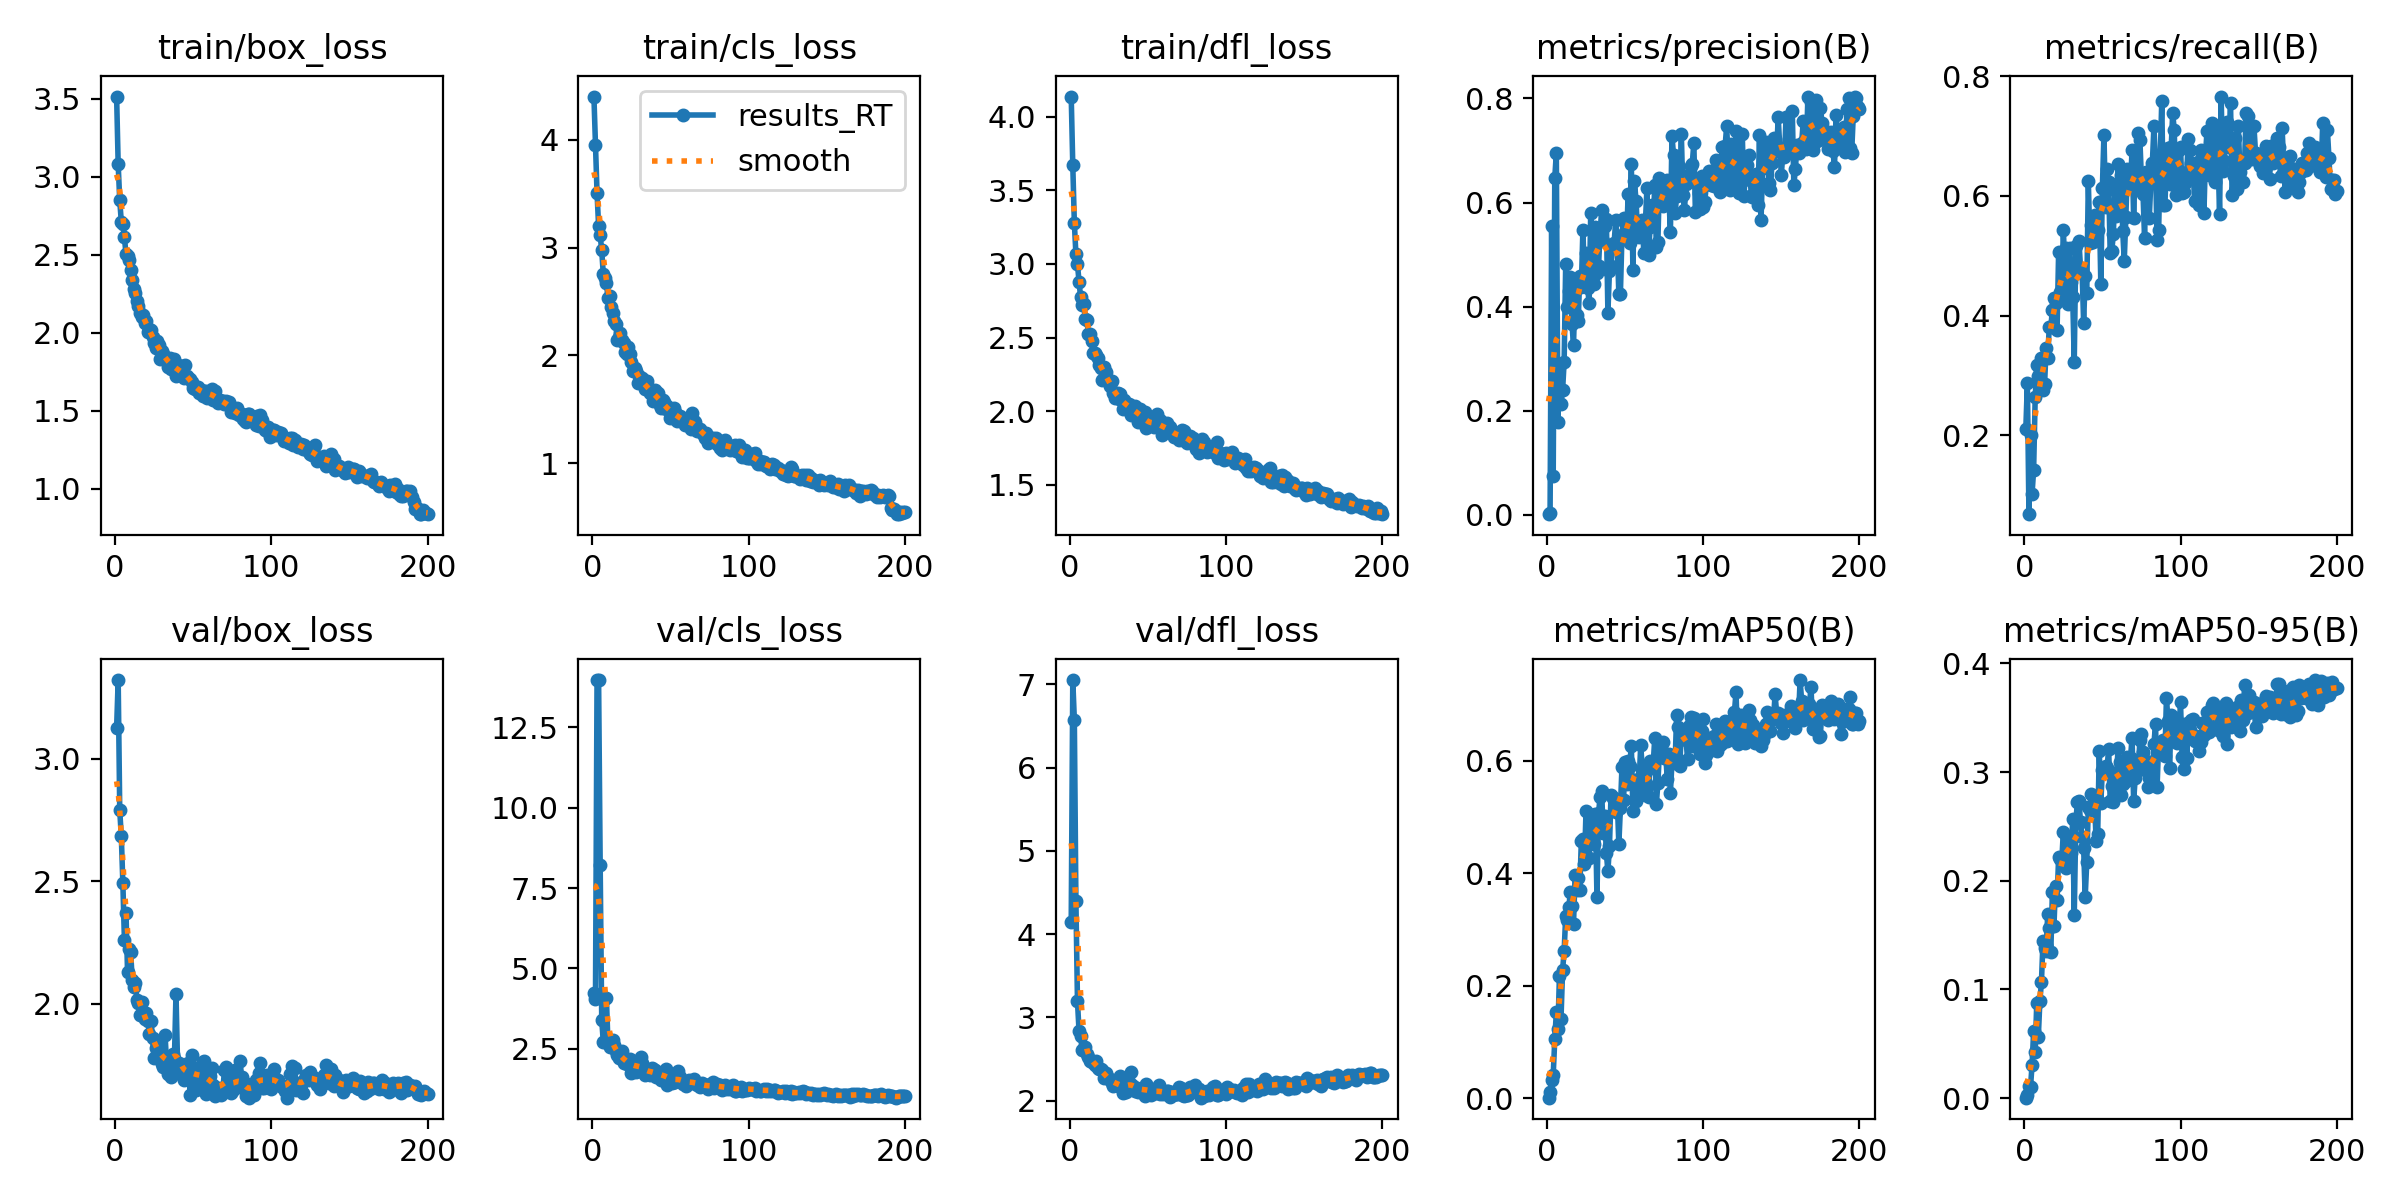
以及变化曲线图:


在此训练结果下,使用该模型进行预测得到的结果如下:
可以发现有部分结果不尽人意,原因在于没有使用预训练模型,同时训练次数过少。
下面使用预训练模型以及提高训练次数到 200 轮。
训练过程中得到的 csv 文件的截图如下:
使用训练出来的模型进行预测的结果基本如下:
对比 YOLO 11 和 RT-DETR
首先是对比 yolo 11 使用预训练模型与 RT-DETR 不使用预训练模型在 50 epoch 下的结果:
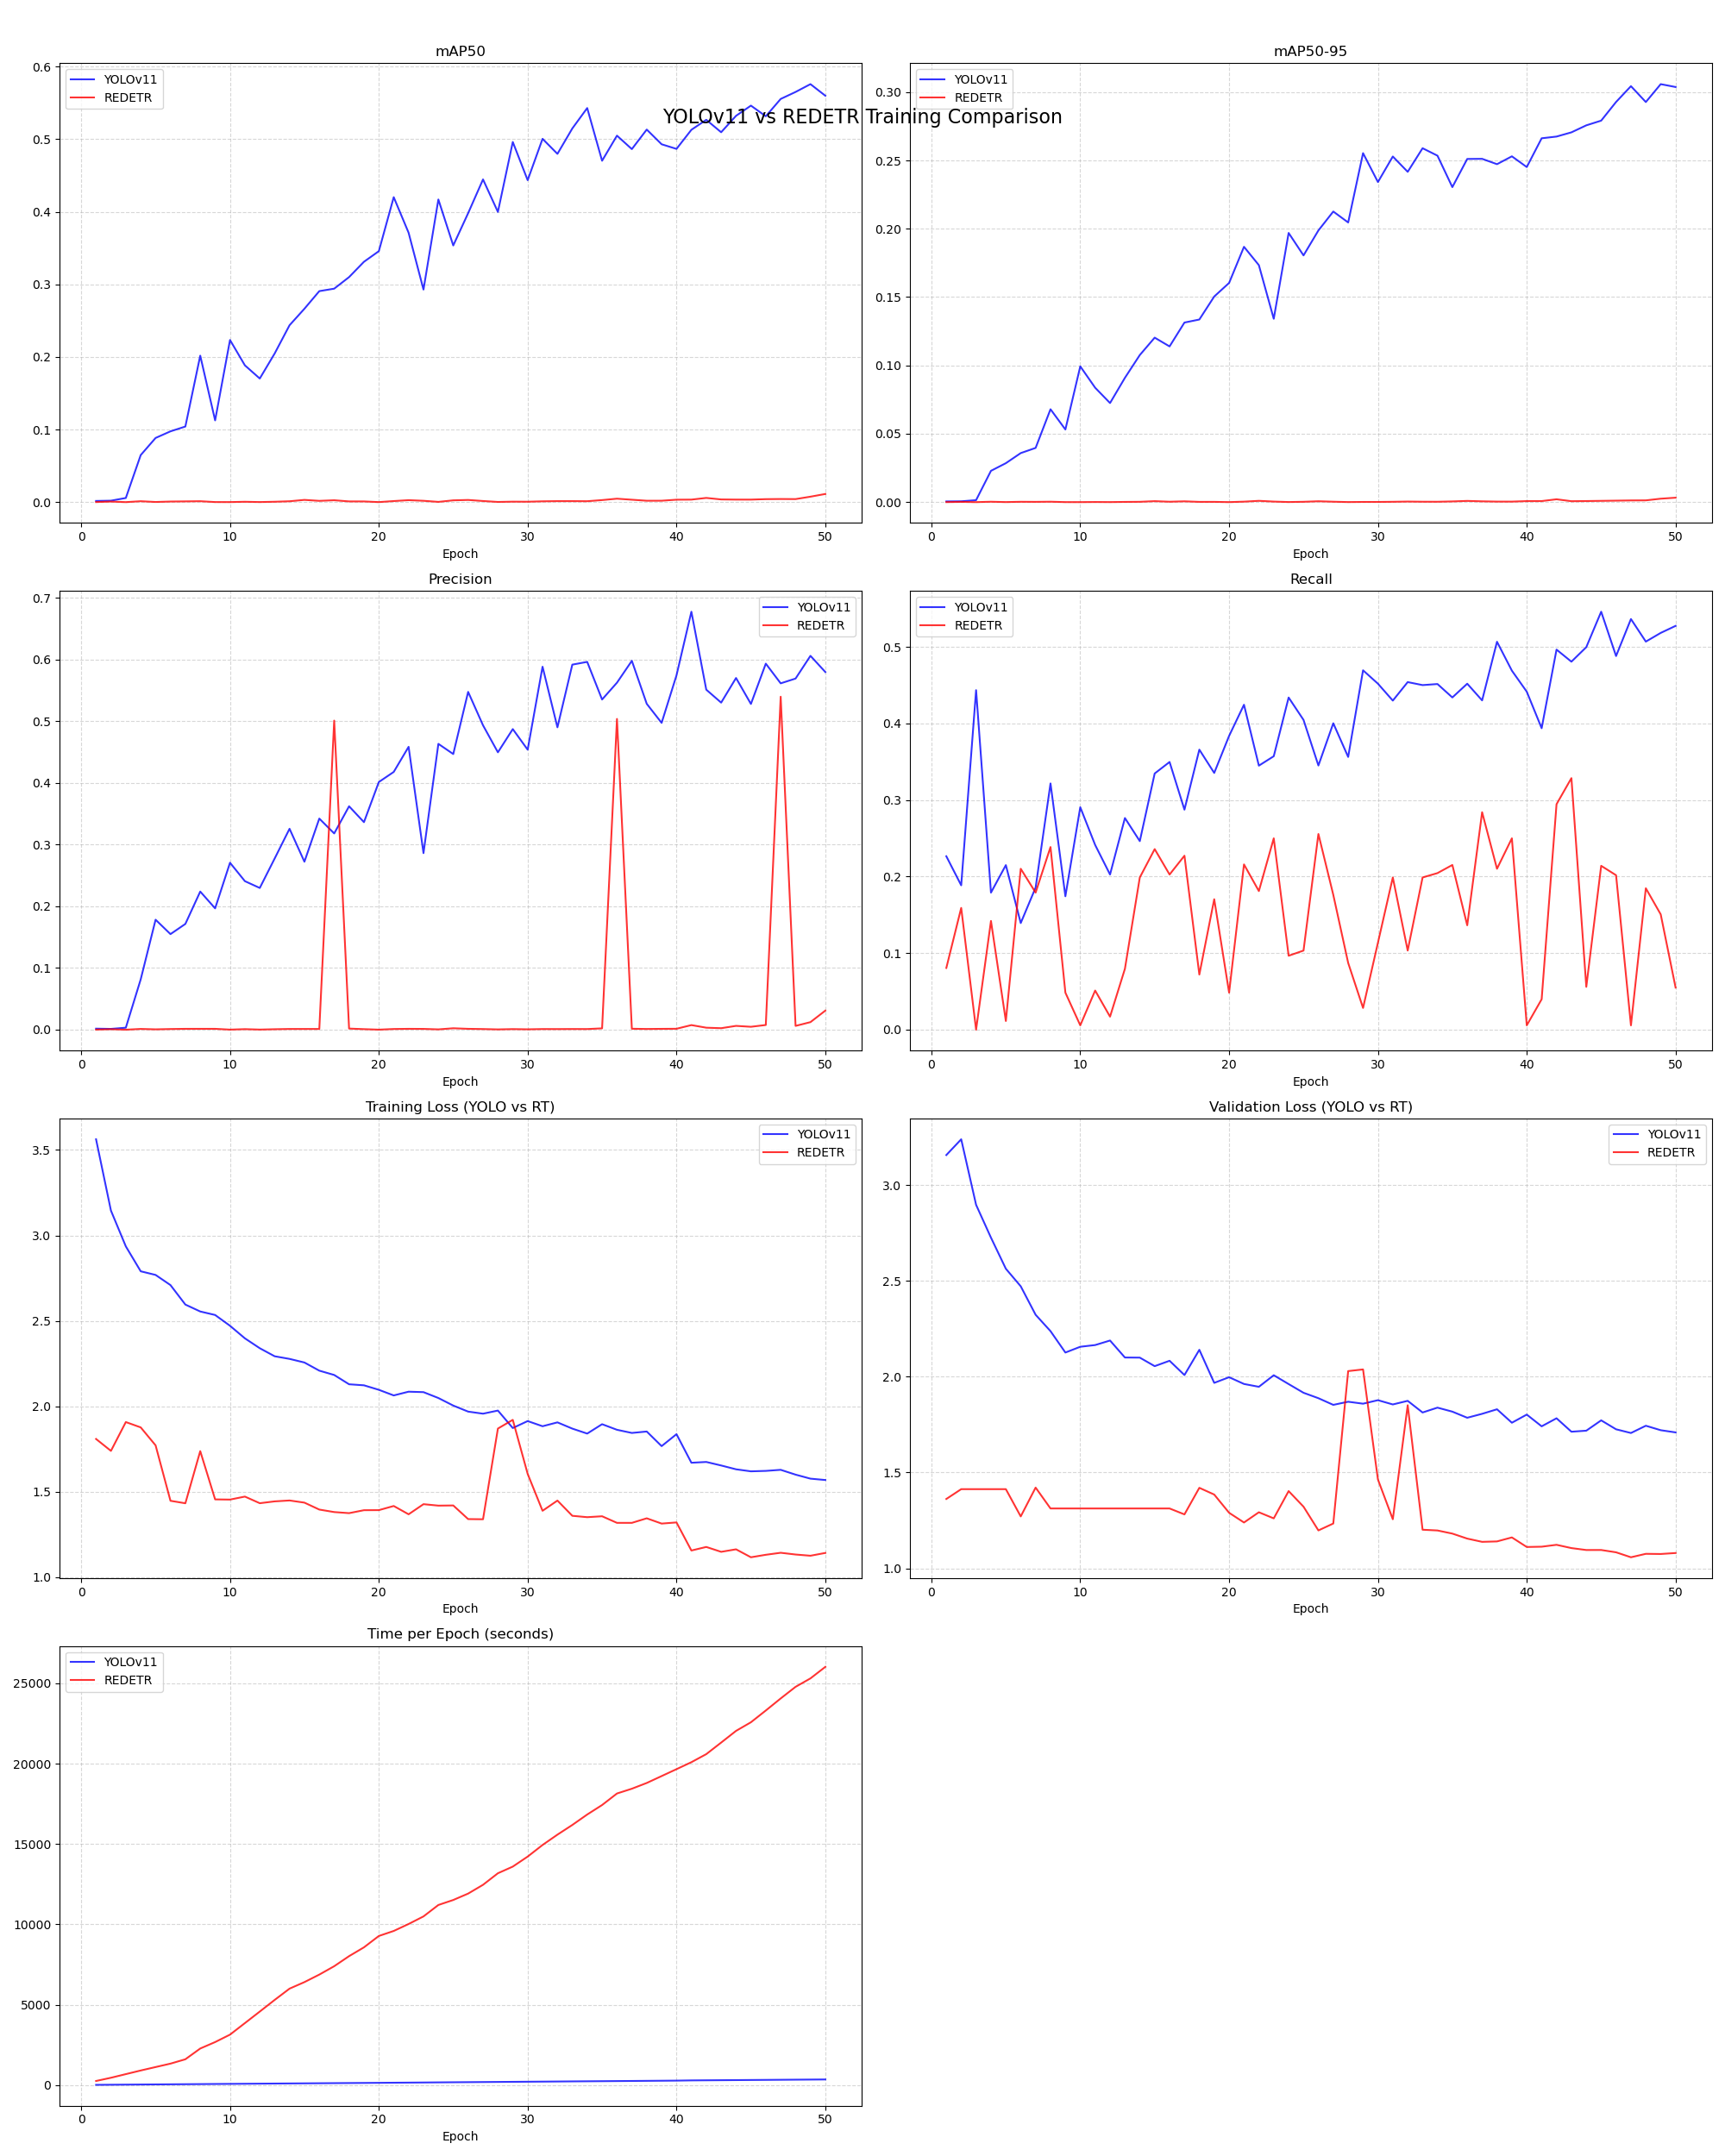
得到结果发下,RT-DETR 训练结果非常差。针对一些图片不能正确识别出来是否佩戴口罩。
同时,对比,yolo 11 使用预训练模型与 RT-DETR 使用预训练模型在 200 epoch 下的精度对比发现其精度类似。
最后,分别使用 yolo 11 使用预训练模型、RT-DETR 不使用预训练模型和 RT-DETR 使用预训练模型在同一张照片上进行推理,得到的结果如下:
Image 1/1 E:\LEARN\Self-learnMod\PatternRecognition\mask_det\ultralytics-main\datasets\images\test\484. Jpg: 448 x 640 3 masks, 94.1 ms Speed: 2.8 ms preprocess, 94.1 ms inference, 4.3 ms postprocess per image at shape (1, 3, 448, 640) Results saved to runs\detect\predict 13 YOLOv 11 推理时间: 2.29 秒 WARNING ⚠️ Environment does not support cv 2.Imshow () or PIL Image.Show () OpenCV (4.8.0) D:\a\opencv-python\opencv-python\opencv\modules\highgui\src\window. Cpp:1272: error: (-2: Unspecified error) The function is not implemented. Rebuild the library with Windows, GTK+ 2. X or Cocoa support. If you are on Ubuntu or Debian, install libgtk 2.0-dev and pkg-config, then re-run cmake or configure script in function 'cvShowImage'
Image 1/1 E:\LEARN\Self-learnMod\PatternRecognition\mask_det\ultralytics-main\datasets\images\test\484. Jpg: 640 x 640 (no detections), 42.3 ms Speed: 2.5 ms preprocess, 42.3 ms inference, 0.7 ms postprocess per image at shape (1, 3, 640, 640) Results saved to runs\detect\predict 14 RT-DETR 推理时间: 0.41 秒 WARNING ⚠️ Environment does not support cv 2.Imshow () or PIL Image.Show () OpenCV (4.8.0) D:\a\opencv-python\opencv-python\opencv\modules\highgui\src\window. Cpp:1272: error: (-2: Unspecified error) The function is not implemented. Rebuild the library with Windows, GTK+ 2. X or Cocoa support. If you are on Ubuntu or Debian, install libgtk 2.0-dev and pkg-config, then re-run cmake or configure script in function 'cvShowImage'
Image 1/1 E:\LEARN\Self-learnMod\PatternRecognition\mask_det\ultralytics-main\datasets\images\test\484. Jpg: 640 x 640 4 masks, 41.1 ms Speed: 2.4 ms preprocess, 41.1 ms inference, 1.1 ms postprocess per image at shape (1, 3, 640, 640) Results saved to runs\detect\predict 15 RT-DETR 基于预训练的模型推理时间: 0.37 秒
可以发现 [RT-DETR] 的推理速度非常快,yolo 11 的推理速度比较慢,但 yolo 11 的精度较高:
Yolo 11:


RT-DETR 未使用预训练模型:
RT-DETR 使用预训练模型:

 王海平
王海平